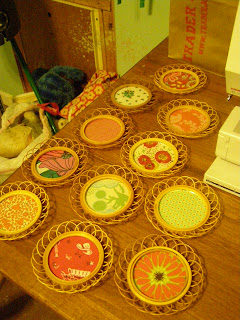
I had so much fun re-purposing those old coasters a couple weeks ago, I decided to look online and see if I could find any more. Much to my surprise, I found a TON! Apparently these Japanese dead-butterfly coasters were very common back in the day. The ones I found online were in much better condition than the ones that I found at the barn sale, and actually look quite pretty in their original form.
Anywho, I bought about a dozen more and decided to chronicle the process I used to re-purpose them in case anyone else is interested in doing the same. :) Enjoy!
Vintage Coaster Make-over Tutorial--Whoop!
Step 1: Find coasters. Try going to Etsy or eBay and typing in "vintage butterfly coaster." Here are some links to current listings: eBay 1, eBay 2, Etsy 1, Etsy 2. Some listings are super-expensive, and some are very reasonable. I hate that the shipping is so high, but I think it's worth it. :D
Step 2: Disassemble coasters. Unfortunately I got a little too excited about my new coasters and didn't think about taking pictures of the process until after I had disassembled all of them. Whoops. It's pretty easy to explain though. :) All you have to do is gently press on the glass/plastic from the front of the coaster. This should pop off the wooden ring in the back and enable you to remove the insert. Once you do this, slide (or peel, if necessary) the old dead butterfly and tissue paper off of the glass.
Step 3: Wash and dry glass and plastic inserts and backing pieces.
I like to fill my sink up with hot soapy water and let them soak, as they usually have a little glue residue around the edges (and sometimes in the middle). A few of the plastic backings here had a lot of residue and discoloration.
This is a plastic backing piece that has cleaned up very nicely.
This is a plastic backing piece that has NOT cleaned up nicely. We will put this behind a darker-colored fabric...:p
Step 4: Cut out fabric circles. Using a back insert piece as your guide, trace circles onto your fabric of choice. You can use a coaster (empty of glass) as a sort of frame to help you choose aesthetically-pleasing sections of fabric. :D Here are my circles:
(Some of these photos are w/ flash and some are w/o flash. This one is with.)
Step 5: Apply Glue. Using an old paintbrush or q-tip (or your fingers, if you like), cover the back insert with lightly with glue. Elmer's glue worked great for me.
Just a very light coating of glue will do.
Step 6: Apply fabric circle to back insert. Using a bit of pressure, smooth the fabric circle over the glue on the back insert. After smoothing it with your fingers, you may also wish to turn it over and rub it on your work surface, just to make sure there are no air bubbles.
Step 7: Put it all together. Turn a coaster upside-down on your work surface. First insert a glass/plastic piece, then place a fabric-covered back insert on top. Put a small amount of glue around the edges of a wooden ring piece (the part that fits into the back of the coaster and holds everything together) and press into place on top of the back insert. Press firmly, but not too hard.
Step 8: Let it dry. You may wish to set a glass or mug down on top of your coaster as it dries, just to help it stick better.
Ta-da! That's it! It is such a fun project. Don't you just love the end result?
Have a fantastic weekend,
Bessie


2 comments:
Wow! Those look really great.
such a nice idea...great..
Post a Comment